10 Steps to Prepare Your Heating System for the Cold Season
Winter is on its way. This is the perfect time to make sure that the heating equipment in your Boston home is ready for the challenges of the cold season. When it comes to avoiding residential heat loss, diligent preparation is the best form of prevention. Here are 10 winterization tips that will extend the lifespan of your heating equipment and that will ensure optimal functioning in the chilly weeks and months that lie ahead.
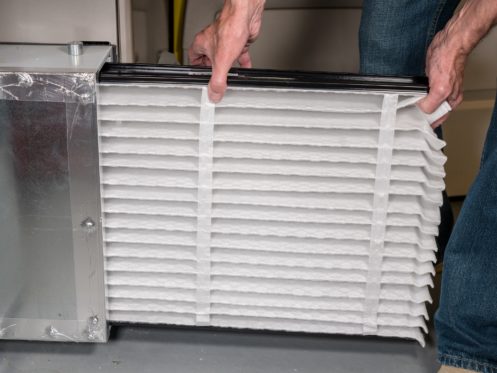
1. Change Your HVAC Air Filter
There’s no easier form of winter HVAC maintenance than changing out your air filter. Replacing your furnace filter will take mere minutes, yet it can shave a considerable amount of money off your home heating bill. That’s because a dirty, clogged filter will make your forced-air heating system work overtime to distribute warm air. If you aren’t happy with the level of air filtration that you’re currently getting, this is also a good time to upgrade to a filter with a higher minimum efficiency reporting value (MERV) rating.
2. Set Your Thermostat and Test Your Heater
Before the cold weather sets in, you’ll need to switch your thermostat from “cool” to “heat.” You can also raise the indoor temperature setting by several degrees to give your heater a quick test run. It should cycle on within just a matter of seconds. If it does not, verify that the power source to your HVAC is on and that all connections are secure. If the heater still doesn’t kick into action, you can schedule an appointment for furnace repairs.
3. Consider Having a Programmable Thermostat Installed
If you’re worried about fast-rising home energy bills during the winter months, consider investing in a programmable thermostat or a smart, Wi-Fi-enabled thermostat. Modern thermostats make it easy to adjust the temperature setting in your home according to your constantly changing needs. With a Wi-Fi-enabled thermostat, you can even make temperature adjustments remotely using your mobile phone or other connected device.
Most HVAC experts recommend keeping the thermostat set at approximately 68 degrees while everyone is in the home and active. This temperature accounts for the residual heat that’s produced by general movement, cooking, and other indoor activities. When you go to bed at night or leave for work, you can lower this setting by as much as 10 degrees. These adjustments will prevent marked increases in your home energy bills during the winter.
4. Have Your Heat Exchanger Professionally Cleaned
There’s good reason for scheduling annual heater maintenance ahead of the cold season. Although you can change your furnace’s air filter and lightly dust external heater components, internal parts such as the heat exchanger need regular attention as well. This component should be inspected and cleaned on a yearly basis to give HVAC technicians the opportunity to identify chips, cracks, holes, or other structural issues and to deal with them. Given that it’s designed to hold and transport combustion gases, when the heat exchanger is damaged, everyone in the home is at risk of carbon monoxide poisoning.
5. Reverse the Direction of Your Ceiling Fans
By nature, heat rises. In some homes, this can lead to excessively warm air just at or near the ceiling, and extremely cold floors. Reversing the direction of your ceiling fans is an effective way to limit your heating bills while ensuring consistently high levels of indoor comfort. When ceiling fans are set to spin in a clockwise rotation, they’ll draw cold air up towards the ceiling and force warm air down into the general living environment.
6. Get Your Vacuum Out
Regularly cleaning accessible heating system features can help you avoid the pervasive, burnt smell of dirt and debris that’s collected on vents, grates, or air registers throughout your home. Use your vacuum cleaner and hose attachment to suction these accumulations off. Not only will your air smell fresher when your heater is first turned on, but your indoor air quality will also be much higher. HVAC professionals can help you thoroughly clean your supply and return vents if these have gotten excessively dirty or if they’re difficult to reach. They can also help you establish an effective and affordable air duct cleaning schedule.
7. Check Your Carbon Monoxide Detectors
Replace the batteries in your carbon monoxide detectors, and perform a quick test on each of these units. If problems develop at your heater’s venting system or its heat exchanger, these devices will alert you when combustion gases enter your home. However, having a functional carbon monoxide detector is not a substitute for scheduling regular heater inspections. This unit is merely a second line of defense. Having a professional thoroughly examine and clean your furnace and all of its internal components is always the best form of prevention against carbon monoxide poisoning.
8. Check Your Furnace’s Intake and Exhaust Pipes
Take a good look at your furnace’s intake and exhaust pipes. These are usually black or white PVC pipes that travel from the furnace to the exterior of the building. Make a note of where they exit through the wall and then look for them on the outside. You should find a curved set of ABS, CPVC, or PVC pipes near your home’s foundation. The intake pipe should be pointing downward and the exhaust pipe should be pointing up. If your intake pipe is positioned above the exhaust pipe, it could be bringing harmful combustion gases to your home. If these pipes have been bent, crushed, or otherwise damaged by severe weather events, they’ll need to be repaired or replaced before you can safely use your heater again.
Check to ensure that both the intake and the exhaust pipe have at least five feet of clearance. Remove any dry brush or other obstructions from the area. If you suspect that any part of your furnace venting system is damaged or incorrectly installed, call an HVAC company right away.
9. Seal Up All Cracks, Gaps, and Other Air Leaks
One very important part of the winterization process is making sure that your home can retain the hot air that your furnace or boiler is producing. In many households, the vast majority of heat loss occurs at improperly sealed windows and doors. Install weatherstripping where it’s needed. You should also inspect all walls and corners for cracks that will allow heated air to slip out. Sealing these up with caulk will limit the amount of work that your home heating system has to do.
10. Upgrade Your Outdated Heater
If your furnace is nearing the end of its lifespan, all of your winterization efforts could be for naught. One of the worst mistakes that homeowners can make is assuming that their outdated heaters can eke it out for “just one more winter.” Having a furnace fail during the coldest part of the year can be devastating, even if you’re able to get a prompt appointment for furnace replacement service. Rushing these projects doesn’t always give consumers adequate time to consider all of their options or to find furnaces with the right range of features and capabilities for their needs. If you know that your furnace is on its last leg now, consider having it swapped out before it fails entirely.
At Blue Bear Plumbing, Heating & Air, we offer affordable heater installation, maintenance, and repair service. We also service air conditioning systems, install water heaters, and provide options in geothermal energy. If you need help getting the heating system in your Boston, Massachusetts, home winter-ready, we’re here to provide it. Call us now to request an appointment.
Contact Us Today

Routine maintenance is vital for the longevity of your plumbing, heating, and air conditioning systems. Sign up for our Blue Care Maintenance Plan for annual service and exclusive membership benefits, including:
- Priority scheduling
- Waived service fee during normal business hours
- 10% discount on service calls
- 3% discount on new installations
- Two-year parts and labor warranty on new equipment


